Showing posts with label Before and After. Show all posts

Tuesday, June 24, 2014

Baby boy’s nursery.

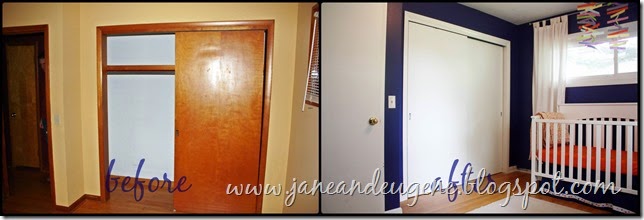
Back when I originally planned this room’s paint color, I didn’t know whether the little one was going to be a boy or a girl. I loved the idea of a navy blue with bright white accents, regardless of the gender of the baby. Well, that decision played to my advantage this time around as well. If you remember, this is what the bedroom looked like when we bought the house, and then what the little one’s nursery looked like after some work:
b&a_1

b&a_3

IMG_0634

I loved how her room turned out. It fit her well – bright, colorful, and happy. Once we found out we were having baby boy, we decided to keep the nursery as a nursery and move the little one into her own new big girl room. We had two main reasons for this: the bathroom in the nursery is really convenient because we use cloth diapers, and because we wouldn’t have to repaint, rebuild the crib, or re-do much of anything for that room. I love the navy, orange color scheme for a boy, so I was excited to get to use it this time around. I added in some grey and green too.

Here is baby’s boy nursery in its current state…

baby boy nursery 1

My mom bought new rugs, so I scored her old one for this room. It’s so nice having a soft rug in there…especially since the old wood floors are super creaky without it! I removed the button crib skirt I made and opted for no crib skirt this time around. I bought the little trash can at Big Lots for like $6 because it was perfect colors. We’ll use that for wipes, and we’ll keep the bigger white trash cans for the used cloth diapers. I also swapped out the Katie Daisy prints that I based the little one’s whole nursery on, and I used clip boards and prints I found either online or made myself. 

baby boy nursery 7

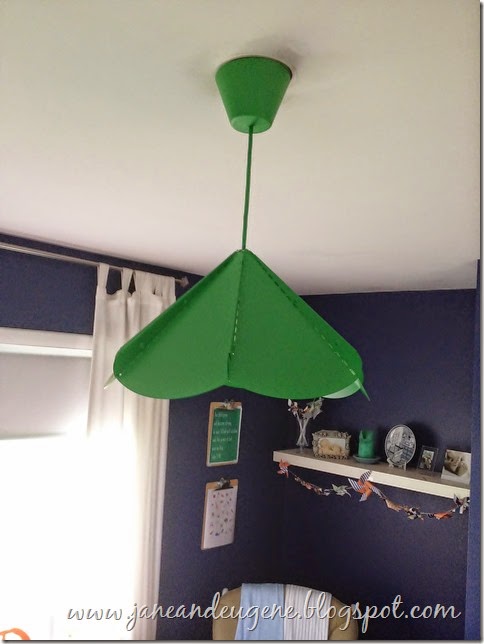
I bought the kelly green pendant light from Ikea for – get this – just $14.99. I was nervous it’d be too green, tut I think it adds nice variety to the space. baby boy nursery 10
I kept the same orange changing table that I originally found on the side of the rode & painted. I used new scrapbook paper and modge podge to update the shelves to from flowery to stripes.

baby boy nursery 9

I loved how the little one’s colorful mobile turned out, but this time around I used scrapbook paper to make pinwheels, glued them to some twine, and created a new mobile for our little guy. {Just Google how to make a pinwheel. It was super easy!}

baby boy nursery 3


 baby boy nursery 4

baby boy nursery 5

I had some extra pinwheels, so I made a little garland with them. I still need a lamp and some new decor items on the shelf.

baby boy nursery 8

 baby boy nursery 7   

I still have some ideas of things I’d like to add to the room, but for now, I’m happy with the results so far. :)

baby boy nursery 6

We are getting quite excited to meet baby boy. I can’t wait to see what kind of personality he has, how he looks, and how he and his big sister will interact. We have some exciting times ahead of us, that’s for sure!

signature4

Monday, January 6, 2014

Living room update.

Having a one and a half year old and a big dog aren’t easy on rugs. The last rug I had was too small for the room, and it also didn’t clean up well. The room’s changed just slightly since I first bought the rug.

IMG_9579

The past year or more, we’ve gone rug-less in the living room, and I’ve been looking for the right rug {in my budget} for quite some time now. Libby & I took a girls trip to Garden Ridge in hopes to finally purchase a rug. The rug below was my first choice. It was close to an 8x10, but was only $100! After some considerations, the fact that it was low pile and the background was an almond color {shows dirt easily}, I decided to keep looking.

photo 1

I settled on a medium bluish grey rug that’s a high pile shag. Eugene loves soft comfy rugs, and he was the biggest proponent of getting a new rug so I thought he’d be a happy with my choice.

photo 2

I also brought home a nice soft shag rug and some fart {faux art.} ;) The blues, yellows, and greens in the canvas tie in the kitchen color scheme nicely.

IMG_5368b

So here are the rug and canvas in place…

IMG_8557b

IMG_8546b

This is the view from the dining area into the living room. On an unrelated note, we finally filled in the floor gap from when we had the half-wall removed. Next on the list – new kitchen flooring, or at the very least, a transition strip. I hadn’t planned on going with grey for a rug. I’m really not a grey girl – or a neutral girl, for that matter. Go figure, my living room is full of tans, whites, and now grey. I see some bright, bold throw pillows, maybe even a colorful bunting in the near future.

IMG_8548b

I like the soft yellow, blues, and greens make it slightly serene. Serene is always good for a full-time working Coordinator and also stay-at-home momma with a toddler. Yep, I’ll take all the serene I can get.

IMG_8545b

Here’s a close-up of the rug. It’s so soft and comfy. The pup is in heaven; he hated the slippery wood floor, so now he’s content as can be just snoozing on the rug.

IMG_8551b

I love that the art coordinates well with the River Reed green paint color from the kitchen. Even looks smooth with the plate wall.

IMG_8552b

IMG_8556b

I can’t decide if I want to hang the canvas or keep it leaning. If I hang it, I may remove my vinyl phrase. I also want to dream up some re-do plan for the fireplace hearth extension. Thoughts anyone? I still have some green mosaic glass tile leftover from our kitchen backsplash, but I think that might be a bit much.

My total came to $214.50, and I had a $100 visa gift card from a wedding I worked, $40 from a Christmas gift, and a 10% coupon so my out of pocket expense was only $53.05! Yay for a room upgrade well within my budget!

So, what do you think? Like my fart? ;)

signature4

Friday, August 30, 2013

A little paint makes a new door.

Our front door – well, really all our exterior doors – were in pretty rough shape when we purchased the house. We’ve since updated our garage door, but our front door & screen door were still in for a long-overdue make over.

IMG_6910b

IMG_6912

Yuck. I bought some indoor/outdoor black paint from Lowes, and a new screen door from Menards.

IMG_6914

I was feeling brave, until I made the first brush stroke. Then I started to have second thoughts. Black seems so permanent to me, but I managed to keep painting through the knot in my throat…

IMG_6915

IMG_6917

IMG_6918

And voila, big changes in the front door area!

IMG_6911b-vert

IMG_6945b

IMG_6938c

IMG_6941

I knew it would be a big change to paint the door black, but it’s even better than I imagined! I love love love the black exterior. Looks brand new, but it’s the same door as before! Ten dollars brought big impact!

IMG_6939

IMG_6943

IMG_6910b-horz

I took an even bigger risk and painted the interior black also. I’m still not certain how I feel about it, and the pics are awful with the lighting, but in keeping with my “keep it real” motto for this blog, here ya go…

IMG_6928b

My mom & sister like it, and I think I do too. I’m still deciding though. I really just liked the glass image reflecting in the photo frame in the photo below…

IMG_6930

Oh, and our door that goes from the garage into the house – disgusting. Totally disgusting. And that’s after I scrubbed and scrubbed it!

IMG_6936b

So how about this $10 transformation?

IMG_6935-horz

Sooo much better!

signature4

Saturday, August 10, 2013

House tour: bathroom.

I’m wrapping up the virtual house tour. For the past posts, you can see them here: guest bedroom, little one’s room, master bedroom, living room, kitchen and dining room.

Our main bathroom is small, but it’s been through a mighty DIY transformation. Most of the projects are detailed in the bathroom reveal post; however, Eugene put in new flooring since then.

This room was bad, bad, bad when we moved in…

bathroom ceiling

bathroom vanity

IMG_3981

IMG_3984

And here’s the now…

IMG_5405b

I think I’m most proud of this room & the kitchen for transformations on a low budget. I painted the pink tile. Yes, painted, and it’s holding up marvelously! Still looks good as new! I spray painted the faucet, but that one’s not holding up quite as well. I’ll probably need to repaint soon due to some chipping. I sewed ruffle curtains and added a lengthening ruffle strip to the shower curtain. We had someone come in and fix the ceiling, and Eugene & his dad installed a new vent/light. {Still need to install one more light.}

IMG_5406b

IMG_5407b

IMG_5408b

Looks much better than the befores, huh! I have a few more projects up my sleeve for this room, but I’m super happy with its transformation.

signature4

Related Posts Plugin for WordPress, Blogger...