Showing posts with label Crafts. Show all posts

Wednesday, July 23, 2014

Flower girls.

I shared pictures from the wedding, but I had a ton of flower girl pics still left to share. So, here ya go – a post full of mint tulle and blonde curls! ;)

flower girls11

The picture above is just the girls coloring while we waited for photos to begin. They were troopers the whole day; so proud of them!

aela2-horz

Cate was much better at smiling for the camera than my little one. Cate looks angelic to me in the photo below!

cate4-horz

With the beautiful bride…          

flower girls6

And this one was not staged. They just grabbed each other’s hand and went walking. {Love it.}

flower girls7-horz 

Oh, by the way, my sister & I made their tutu dresses using this tutorial, but we didn’t tie the tulle again for the waist. I just put the ribbon on them the day-of. The dresses turned out to be more see-through than I expected, mainly when the girls would twirl in them or sit down. I sewed some liner fabric {part of a ribbed tank top actually} and had her wear some white spandex shorts too. When they were in the ceremony, you couldn’t tell one bit, but once they got dancing you could definitely see the shorts/lining.

flower girls12

They made it down the aisle with no tears…and no shoes! {Their shoes gave them blisters.} I’ll take the trade of no shoes for two happy flower girls any day!

flower girls13

The rest of the pictures were taken after the ceremony.

 cousins

Sisters. Cousins. Two sets of best friends.

aela9

This was towards the end of the night – what an ornery smile.

aela6

The girls loved sitting in the big picture window right behind the head table. By this point, I was really picking my battles, plus it was pretty cute to watch Eugene entertain them!

daddy3 

aela10

Once the DJ started playing some upbeat music, the little one got a whole new burst of energy. She was running around and dancing NONSTOP.

aela5

aela11

Both girls were dancing machines from the start of dinner until my sister and I pulled them off the dance floor to put on PJs.

I think it’s safe to say they had a blast. I love these little flower girls!

signature4

Tuesday, June 24, 2014

Baby boy’s nursery.

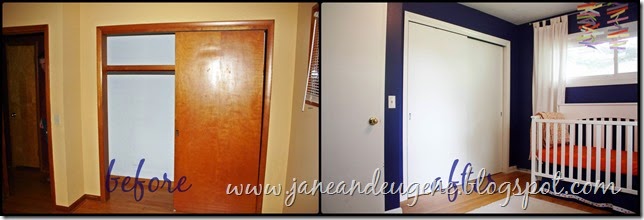
Back when I originally planned this room’s paint color, I didn’t know whether the little one was going to be a boy or a girl. I loved the idea of a navy blue with bright white accents, regardless of the gender of the baby. Well, that decision played to my advantage this time around as well. If you remember, this is what the bedroom looked like when we bought the house, and then what the little one’s nursery looked like after some work:

b&a_1

b&a_3

IMG_0634

I loved how her room turned out. It fit her well – bright, colorful, and happy. Once we found out we were having baby boy, we decided to keep the nursery as a nursery and move the little one into her own new big girl room. We had two main reasons for this: the bathroom in the nursery is really convenient because we use cloth diapers, and because we wouldn’t have to repaint, rebuild the crib, or re-do much of anything for that room. I love the navy, orange color scheme for a boy, so I was excited to get to use it this time around. I added in some grey and green too.

Here is baby’s boy nursery in its current state…

baby boy nursery 1

My mom bought new rugs, so I scored her old one for this room. It’s so nice having a soft rug in there…especially since the old wood floors are super creaky without it! I removed the button crib skirt I made and opted for no crib skirt this time around. I bought the little trash can at Big Lots for like $6 because it was perfect colors. We’ll use that for wipes, and we’ll keep the bigger white trash cans for the used cloth diapers. I also swapped out the Katie Daisy prints that I based the little one’s whole nursery on, and I used clip boards and prints I found either online or made myself. 

baby boy nursery 7

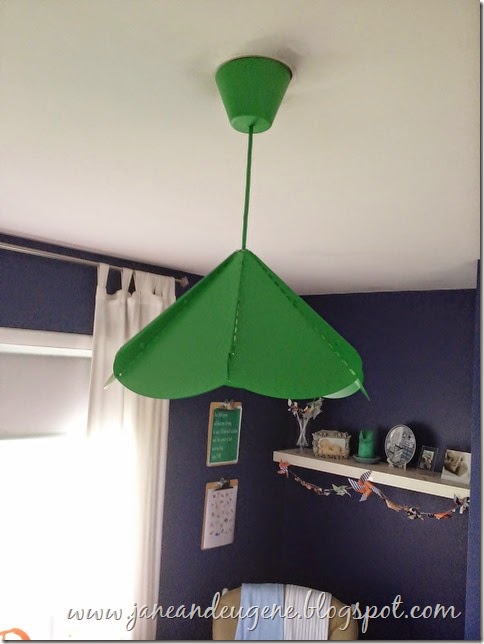
I bought the kelly green pendant light from Ikea for – get this – just $14.99. I was nervous it’d be too green, tut I think it adds nice variety to the space. baby boy nursery 10

I kept the same orange changing table that I originally found on the side of the rode & painted. I used new scrapbook paper and modge podge to update the shelves to from flowery to stripes.

baby boy nursery 9

I loved how the little one’s colorful mobile turned out, but this time around I used scrapbook paper to make pinwheels, glued them to some twine, and created a new mobile for our little guy. {Just Google how to make a pinwheel. It was super easy!}

baby boy nursery 3


 baby boy nursery 4

baby boy nursery 5

I had some extra pinwheels, so I made a little garland with them. I still need a lamp and some new decor items on the shelf.

baby boy nursery 8

 baby boy nursery 7   

I still have some ideas of things I’d like to add to the room, but for now, I’m happy with the results so far. :)

baby boy nursery 6

We are getting quite excited to meet baby boy. I can’t wait to see what kind of personality he has, how he looks, and how he and his big sister will interact. We have some exciting times ahead of us, that’s for sure!

signature4

Monday, May 6, 2013

Wire welcome.

I made some more wire fabric-wrapped letters. This time I spelled out “Welcome” and attached it to my wreath on my front door with some hot glue…

IMG_4816

IMG_4815

IMG_4818

IMG_4817

It’s a little subtle color on my door, and a nice message to visitors. :)

signature4

Thursday, April 18, 2013

Wire fabric-wrapped letters.

I saw this craft on a blog I read and also on an Instagram feed I follow, but I couldn’t find a tutorial anywhere. I sat on the idea for a few months {I’ve been ridiculously/overwhelmingly busy lately}, but I finally had a reason to go out and buy the supplies. I decided to make a housewarming gift for a good friend from my life-group at church who is moving to Texas. She’s pictured below on the far left…this is at my baby shower a while back. {Wow, I forgot how low I carried!}

IMG_0517

“Joy” has been our theme for the last year and a half, so I thought it’d be a nice reminder of our time together…

image_5 (2)

I’m not sure if this is the best way to make them, but this seemed to work alright for my first try. Oh, and sorry about the blurry, poor-quality photos. I did this late at night and didn’t think to use my nice camera much. Here are my supplies…

image

I bought the galvanized wire at Walmart. I can’t remember the exact price, something like $3.80, definitely under 4 bucks. And I have tons left – lots more words to shape up. {I think “hope” will be my next project.} Other than the wire, I only used some pliers, leftover fabric {two were old button-up shirts of mine, and the other is a vintage sheet I bought at a thrift store.} Oh, and I used a hot glue gun too.

First, I shaped the wire into my word. It’s a good thing I learned cursive ;)’

image

I didn’t really take photos from this point on, but it was a super simple process. I cut long strips of fabric about 1-1.5” wide and as long as the fabric allowed, for most of the strips this was probably around 20” long. To start each piece of fabric, I just put a little hot glue on the end of wire and pressed the fabric onto it.  I wanted to use different fabric for each letter, so I used the same method at the start of each letter. It would look cute to do the same fabric for the whole word too though.

image

For the fabric strips, you could either iron the edges of the fabric under if you wanted a clean look, or leave the fabric’s edges raw to go with the slightly frayed look. I folded it under some just as I wrapped, but there were some frays showing, and I was okay with that.

image

When I got to the end of the letter/word, I just hot glued the fabric down and cut away any excess. See, I told you it was a synch!

image

image_1 (2)

This was a really inexpensive craft that only took me about 20-30 minutes from start to finish.

image_4 (2)

It was surprisingly sturdy once the fabric was added. You could hang it on your wall, display it on a shelf, or just stick it on your desk.

image_5 (2)

EnJoy!

signature4

Monday, March 25, 2013

My $1.18 pillow.

I picked up this placemat at Target last week…

pm1

It was a splurge ;)

pm2

I made it into a pillow in about 15 minutes by using a seam ripper to open up about 6” on one side, stuff it with some pillow fluff and hand stitch the opening shut. Voila…

pm3

Easy peasy, cheap and cute!

signature4

Related Posts Plugin for WordPress, Blogger...